
TECH TIP ARTICLES FOR INNOVA MACHINES
Do you want to learn a few tricks with your longarm but you're not sure where to start?
Check out these articles
Check out these articles
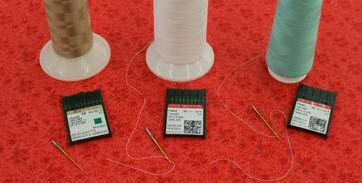
Needles and Thread - A good sewing machine technician can probably make any combination of thread and needle work. However, I would recommend some basic rules or stick to a certain style needle and weight thread. From my experience when running edge to edge quilts at medium to high speed (15-20 feet per minute(fpm), an 18 needle or larger is recommended to minimize needle deflection. After the needle size is chosen for speed and style of quilting, the proper thread weight should be chosen to match the size of needle. When using an 18 needle the proper thread is 40 wt. If running 30 wt thread an 18 size needle will probably produce acceptable results, but a 19 would be the proper size needle. If running 50 wt I would recommend the quilter utilize a 16 needle. If a 16 needle is chosen the operator should quilt slower and more smoothly or needle deflection will create undesirable results probably causing skipping or breaks. We ship machines with size 18 needles installed in the machine and in the parts kit, because it is the proper size for 40 weight quilting thread and has minimal needle deflection at the estimated average linear speed of 16 fpm. - Neal Schwartzberger, President of ABM International/Innova
Bobbin Tension - Ever gone to take a look at your stitches after finishing a row only to find your tension going in and out throughout the row? How about having the bobbin tension be wrong even though you've checked it repeatedly? We're going to take a quick look at the likely culprit for this things, the 2 different springs on each bobbin case.
Every bobbin case has 2 springs on or in it. One is the spring on the side that is used for tension on the thread, the other is the anti-backlash spring that rests inside the bobbin case, beneath the bobbin. Generally, these are sturdy and difficult to damage, but there are a number of things, that can bend or damage one, or both springs, like dropping the bobbin case or the needle hitting it.
Every bobbin case has 2 springs on or in it. One is the spring on the side that is used for tension on the thread, the other is the anti-backlash spring that rests inside the bobbin case, beneath the bobbin. Generally, these are sturdy and difficult to damage, but there are a number of things, that can bend or damage one, or both springs, like dropping the bobbin case or the needle hitting it.
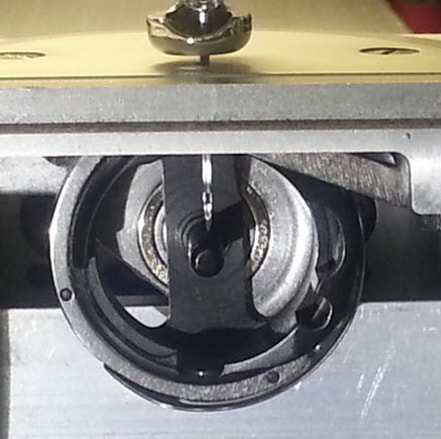
First, the anti-backlash spring. It's exceedingly difficult to damage this spring. Far more likely is for the spring to get knocked out of the bobbin case itself, and then not get put back in properly. This is something that many people overlook, but when inserting the anti-backlash spring, you have to get the fins on the sides into some grooves in the case.
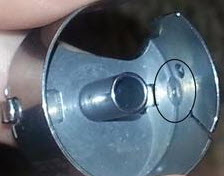
If you look closely at them, they are actually 2 different sizes, which means there is a right and a wrong side when putting it in. Now, if you take a look at the picture on the right, you'll see one of the two grooves for the fins. The other is straight across for the one pictured. Make sure that both fins fit in the groove, otherwise you're putting the spring in backwards. Generally I'd recommend a small, flathead screw driver to help maneuver it.
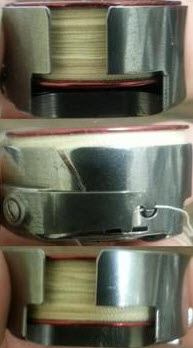
Why is it so important to get this right? Well, take a look at the picture on the left. The top one is what it should look like on a bobbin with the spring put in correctly, the middle and bottom springs have been put in wrong. The spring actually pushed the bobbin out against the back of the bobbin hook, which adds just a bit of tension to everything when it sets correctly, like the top one. Set wrong, you're either going to be adding way to much tension (middle picture) or virtually no tension (bottom picture). In either case, it's going to mess with your tension throughout the quilt if it's not set right.
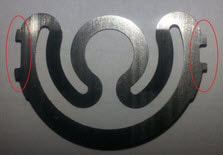
Next up, we have the bobbin case's tension spring. If you've got a row on your quilt, and the tension looks like its going in and out as you go along, this is what you want to look at. If you look at the picture to the right, you'll see the small slit that your thread goes through to leave the bobbin case. As you turn the tension screw to the right, that slit shrinks, increase the tension. Go to the left and the slit grows, decreasing the tension. Now, if that spring were to bend, that slit would no longer be the same size it's entire length. One side would have a smaller gap then the other, which means as the thread moves around in the slit, its tension is going to continually change depending on where it is. It is very difficult to tell if this problem is present when you look at. Instead, make sure the thread is coming out of one side of the gap, feel the tension, then move to the other side of the gap, and do the same. You should be getting virtually identical amounts of tension on both sides. If you're not, there's a good chance the tension spring or the bobbin case itself has been bent, and needs to go in for repairs or be replaced.
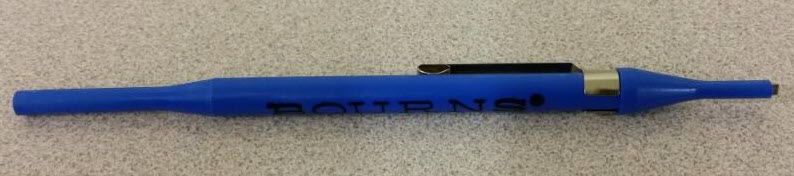
Trimmer tool - We're going to take a brief look at a tool most quilting machine owners should have, but not many do: a trimmer tool. Pictured above, the trimmer tool is a plastic tool that resembles a small pen, but it's actually a special type of screw driver.
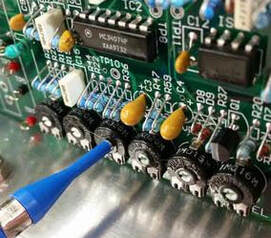
This tool's main purpose is for adjusting an electric component on many quilting machines known as a trimmer potentiometer or trim pot for short. When you're fine tuning these trim pots, you're going to have a much easier time adjusting them with the machine left on instead of turning the machine off. Because of that, you want a non-conductive and non-magnetic screwdriver to adjust them, which is exactly what this tool is designed for.
Having said that, NEVER adjust the trim pots on your quilting machine without your dealer telling you to. Having any of these adjusted incorrectly can make the machine do all sorts of crazy things you don't want it doing. So, while the tool is important to have just in case, it's not something you'll be using often, if ever, for its intended use.
|
|
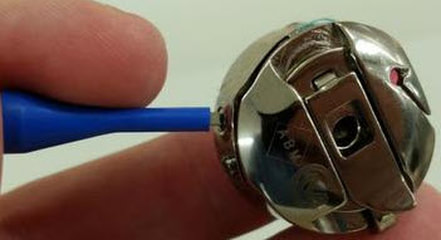
Fortunately, these tools are not only nice and inexpensive, but they have a secondary use that every quilter will see on a regular basis. The screwdriver blade on the trimmer tool is the perfect size for adjusting your bobbin tension, with a larger handle then most of the screwdrivers with that size blade.
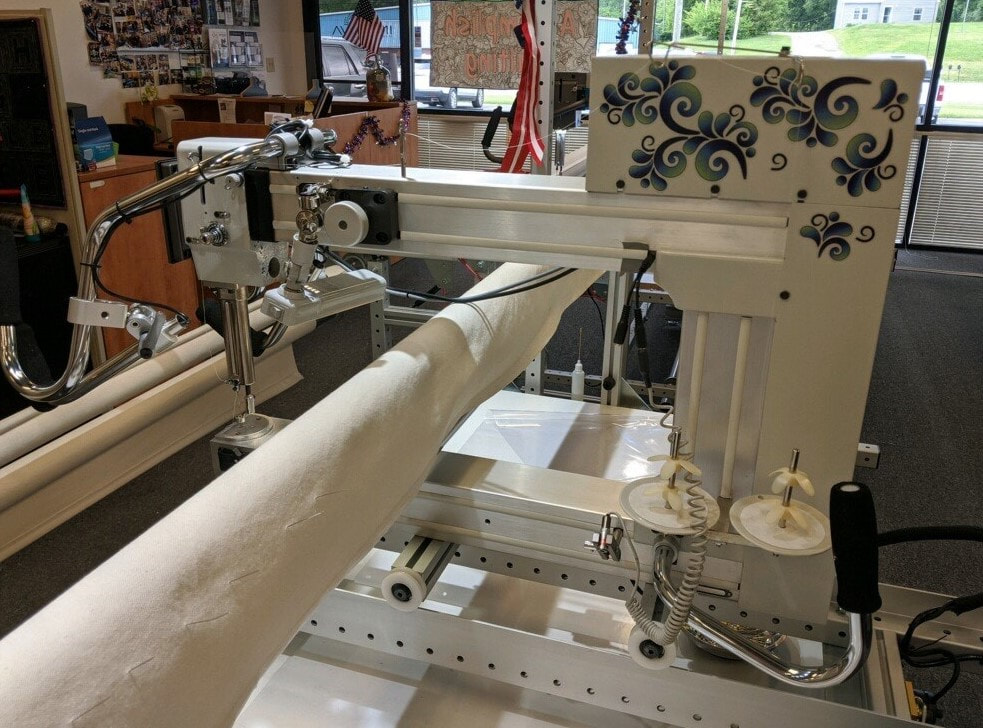
Take-Up Roller Systems - We're going to take a look at another feature of every long arm quilting system, and that's the take-up roller system. Every brand of long arm has a system in place for how the quilt gets rolled onto the take-up bar, and how you make any adjustments you need to on it.
The take-up bar system is often overlooked when people are considering a longarm purchase, but it's absolutely something you're going to want to keep in mind, as it can directly impact your quilt quality. For a quilt to come out best, you need to have a leveling sewing surface from the backing bar to the take up bar. It's important to keep in mind that the diameter of the take up bar is going to be changing as you roll more and more of your quilt onto it, which means the take up bar has to change heights to give you that level sewing surface.
For the most part, there are 4 systems used across long arm machines for this. There are four pictures below showing the differences. The first two we're going to take a look at involve only 1 bar. With only 1 bar, the quilt goes directly from the backing bar to the take-up bar, so as the quilt rolls, the take up bar has to be raised to account for that. Many frames have adjustable sides (seen in the picture to the left above) for that. You have to raise one side of the take up bar, go around the frame, raise the second side, and make sure you've gotten the take-up bar level again. Another common system is the adjustable take-up bar. On these, there's either a crank or lever that allows you to raise or lower the entire take-up bar at once. This eliminates the need to go to the other side of the machine and the need to make sure the bar stays level, which makes this system considerably less tedious to adjust throughout the quilt.
The other 2 styles use a second bar, often referred to as a "dead" bar. On these systems, the quilt goes around the dead bar before rolling onto the take-up bar. Because it goes around the dead bar, the increased size of the take-up bar doesn't come into play at all, which means no adjusting.
The different styles here are dependent on where the dead bar sits. Uneven dead bars have no adjusting involved, but because they sit unevenly, you lose out on some of your quilting space because the dead bar is sitting in it. Even dead bars have no adjusting involved, and still give you the maximum amount of sew space that particular long arm frame is capable of.
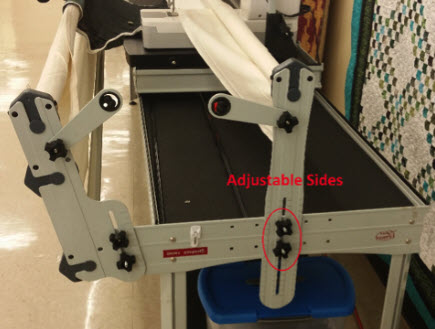
System with Adjustable Sides
|
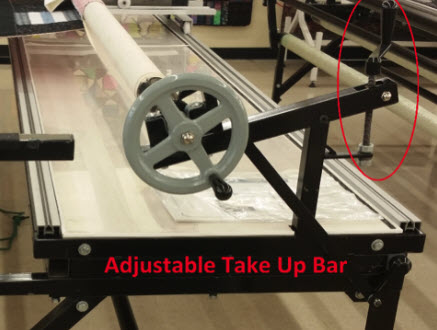
Adjustable Take-up Bar
|
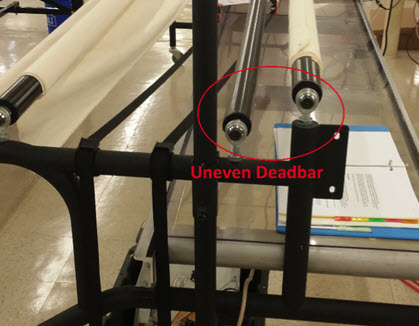
Uneven Dead Bar System
|
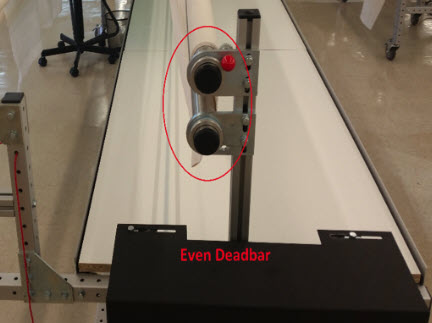
Even Dead Bar System
|
Standard Tension Assembly - We're going to take a look at the main tension assembly of the Innova Machine's. There are a couple of things on it that have to be set and positioned properly for it to do its job, and if you ever have to take it out, you definitely want them set back the right way. First things first, the tension assembly has to be put together properly.
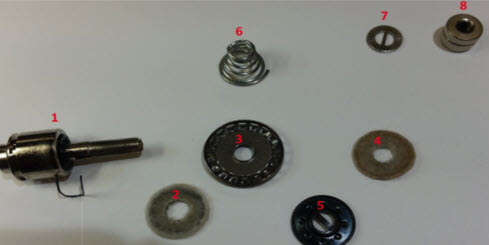
These are all the parts of a standard tension assembly, labeled in the order the go on. One thing to note is that to 2 felt washers (#2 and #4 in the picture) should be replaced roughly once a year to keep everything spinning smoothly.
The 3 other things that need to be set correctly are where the check spring is pointing, how far into the machine the assembly is, and how tight the check spring is. The first two need the bolt holding the assembly in place to be loosened, so let's take a quick look at that.
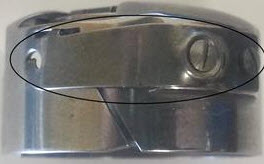
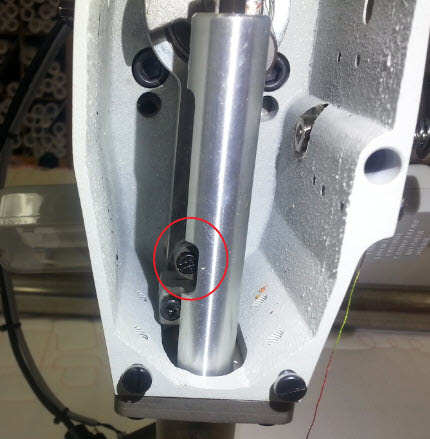
You'll need to loosen the 3 screws circled in the picture to the left first, so you can take the front plate off the machine. The bolt securing the tension assembly is circled in this picture below, and takes a 4mm allen wrench to loosen up. None of these screws need to be taken completely out, only loosened up.
The 3 other things that need to be set correctly are where the check spring is pointing, how far into the machine the assembly is, and how tight the check spring is. The first two need the bolt holding the assembly in place to be loosened, so let's take a quick look at that.
You'll need to loosen the 3 screws circled in the picture to the left first, so you can take the front plate off the machine. The bolt securing the tension assembly is circled in this picture below, and takes a 4mm allen wrench to loosen up. None of these screws need to be taken completely out, only loosened up.
|
|
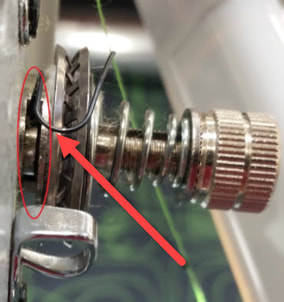
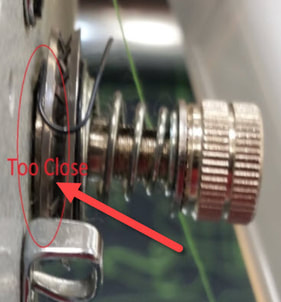
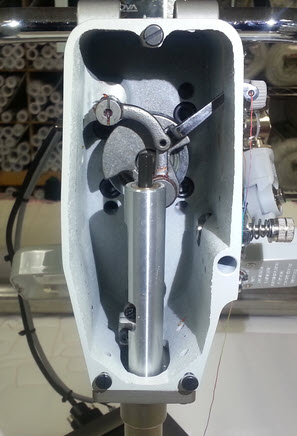
With that done, the tension assembly can now be slid in and out of the machine as well as spun around. For the check spring to do its job properly, the BACK part of the spring (the part that's within the circle in the picture to the left) needs to be pointing up to the black screw above it. If it's not, the check spring won't be applying the right amount of tension to the thread, and potentially cause you all sorts of tension issues. The second thing that needs to be set right is how far into the machine the tension assembly is actually set. Too far in, and the check spring hits the machine preventing it from moving correctly, while too far out doesn't allow the thread to flow smoothly from the assembly into the thread guide. In the pictures below, the one of the left is what you're looking for. The check spring is in line with the thread guide, while the check spring isn't rubbing against the machine. The picture on the right shows it when it's pushed in too far, you can see the check spring hitting the machine, which stops it from moving well.

|
|
|
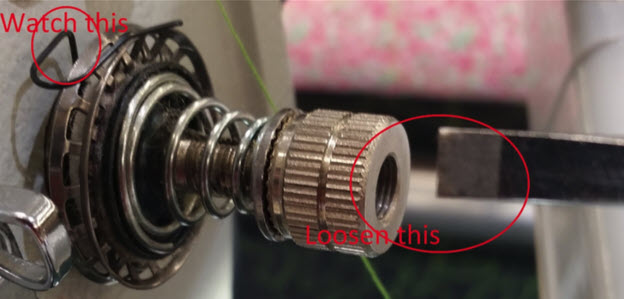
Once you've got both of these set correctly, you can re-tighten the 4mm allen screw the holds the tension assembly in place (be careful that the tension assembly doesn't move while you're tightening it down). The only thing left is to adjust just how tight the check spring is. You'll need a flathead screwdriver for this. As seen below, at the end of the tension assembly is a hole with a flathead sized groove inside. Using the screwdriver, gently loosen (spin the screwdriver counter-clockwise) the screw while watching the check spring. As you loosen, you should see the check spring start to move to the left. When you see that, stop, and imagine the screw is a clock face. You want to tighten the screw (spin the screwdriver clockwise) approximately 10 minutes on that clock face. That'll tighten the check spring up to right where you want it, and you'll have properly set everything on your tension assembly.
Quilt Frame Lifts -
We're going to take a look at the 2 types of lifts for longarm frames and what makes them different. Almost every type of longarm frame offers some type of "lift" attachment for the frame, and they fall into one of two categories: hydraulic or electrical. While they both do the same job (raise/lower the frame), the way they do it is different.
Hydraulic lifts use a small pump to pump mineral oil through multiple oil lines into each of the lift legs. As the leg fills with oil, the foot is pushed downwards, which in turn pushes the frame up. When you want to lower it, the pump sucks the oil back into the main tank, emptying the legs, which allows the frame to drop back down as it empties.
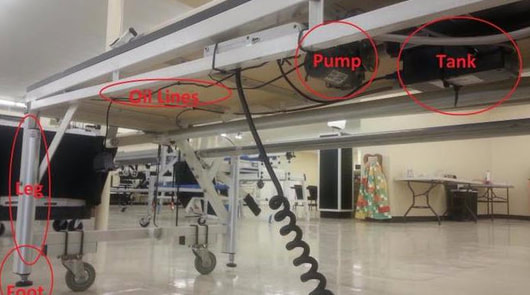
Electric lifts instead use electric motors. These motors push the lift legs up and down, raising the table up or lowering it down. Both types of lifts ultimately do the same job, but do it differently. As a result, there are also some advantages to one over the other. The hydraulic lift pumps oil in and out of the legs using 4 oil lines. Each one of these is plugged into the pump itself. Over the years, the seal of the oil lines can wear, allowing oil to leak onto your floor. Worse yet, as the oil leaves the system, the lift itself will no longer have its full range of movement, possibly even lifting multiple legs lower than others. Replacing the lost oil takes specialized tools. If one of the lines ever gets pinched or crimped, you can have a leak, or a blocked line, both resulting in poor function.
One other thing to keep in mind with the hydraulic lifts is how the frame lowers. The hydraulic lifts lower the frame down using gravity. The lift feet themselves compress back into the leg until the frame's wheels touch the ground. At that point, with no external force on the lift's feet, they also stay on the ground instead of raise up into the legs of the hydraulic lift. If you try to roll your frame around while the lifts feet are still on the ground, you run the risk of scuffing or scratching hard floors and tearing up carpeted floors. Any hydraulic lift owners should make sure to manually raise the foot of the lift to avoid damaging their floors.
Those with the electric lifts, don't have to worry about any of those things.
There's no oil or other fluids involved, so no chance of leaking and staining the floor. The lift's feet are raised by the motor itself, so it'll leave the ground with no additional work, preventing any mishaps the result in a damaged floor.
Overall, the Innova electric lift is the way to go! You will cease to worry about leaks, crimps, uneven lifts and years of service.
Needle Bar Height -
Sooner or later, every longarm quilter is going to see a skipped stitch. Some will see it skip once in a quilt, others will see a dozen times in as many inches, but whichever you see, it's caused by the same couple of things.
One of the most common --- and easiest to fix --- is a worn or improperly inserted needle. When a needle gets worn, it can bend, which will cause the scarf to no longer match up with the bobbin hook, and if it's inserted wrong it won't match up at all.
Another big one is making sure the machine is threaded properly and if it's not, the thread can bind up for a moment before continuing through and that can be all it takes for a skipped stitch. One skipped stitch is bad, but if you don't catch the problem,
it'll just keep happening over the course of the quilt.
The last major cause of skipped stitches is the needle bar height not being quite right. Fortunately, that's an easy problem to fix as long as you know how. See how below.
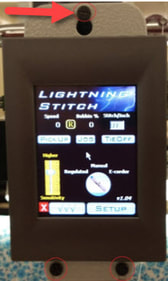
STEP 1: Loosen these 3 circles screws and remove the front lightning stitch plate
Sooner or later, every longarm quilter is going to see a skipped stitch. Some will see it skip once in a quilt, others will see a dozen times in as many inches, but whichever you see, it's caused by the same couple of things.
One of the most common --- and easiest to fix --- is a worn or improperly inserted needle. When a needle gets worn, it can bend, which will cause the scarf to no longer match up with the bobbin hook, and if it's inserted wrong it won't match up at all.
Another big one is making sure the machine is threaded properly and if it's not, the thread can bind up for a moment before continuing through and that can be all it takes for a skipped stitch. One skipped stitch is bad, but if you don't catch the problem,
it'll just keep happening over the course of the quilt.
The last major cause of skipped stitches is the needle bar height not being quite right. Fortunately, that's an easy problem to fix as long as you know how. See how below.
STEP 1: Loosen these 3 circles screws and remove the front lightning stitch plate

|
|
STEP 2: Use the hand wheel to lower the needle to its bottom position. When you do, you'll see the screw circled in the picture on the left below. Loosen that screw, which will allow you to lower the needle bar, as seen in the picture to the right below.
|
|
STEP 3: There's a great tool Innova has for this, but in a pinch, you can use a pin. With the needle bar still dropped down, place a pin in the eye of the needle. With the pin still in the eye, raise the needle bar up until the pin hits flat against the top of the bobbin area, as seen below. Once the needle bar is set, re- tighten the screw from the previous step. After that, just put the lightning stitch back on and tighten those screws down. That's all there is too it! Once you've put the plate with the lightning stitch back on, you're ready to sew!
Surge Protectors - Something to keep in mind when looking at an Innova (or any other longarm) is what you use to protect it. Often times, when someone needs a surge protector, they'll look around the house and use the first one they see. Other people may go out and buy one, but not all surge protectors are equal, some won't do the job. As a surge protector gets older, they no longer do the job as well as they originally did. Some are rated for less voltage and current than what a longarm needs.
Negatives of a "poor" surge protector:
Negatives of a "poor" surge protector:
- There is a high potential for electric fires
- Worn protectors may no longer be doing its job as well as it should.
- Protectors that don't meet the correct voltage and current minimums void the warranty.
- A poor surge protector endangers your quilting machine investment
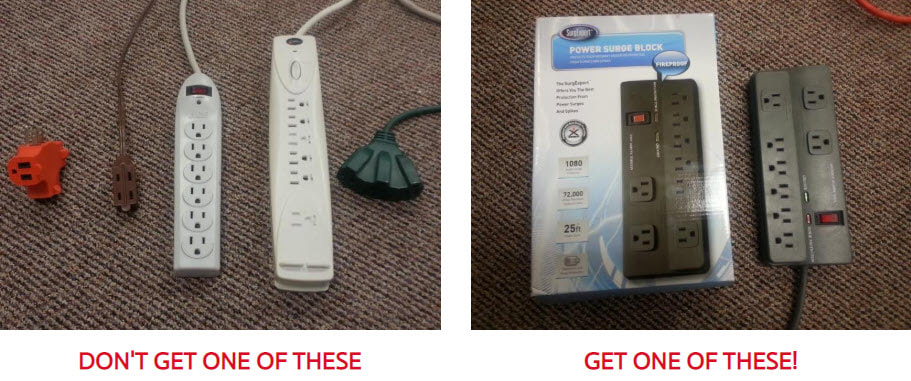
Surge protectors and power strips are NOT the same, power strips are generally no better than plugging into a power outlet and if they offer any protection at all it is very minimum. Surge protectors are rated on a scale of how many joules they offer, once these joules are exhausted the surge protector is no longer protecting the plugged-in devices.
The surge protector that we offer at A/Q has 1080 joules which is above what many industry standards call for.
How would someone know if a surge protector is still protecting your equipment? Many surge protectors will come with a light that illuminates when protecting. Our surge protector offers not only a light to show it is working BUT also offers an audible alarm when a lapse in protection is observed. A rating of 50,000 amps spike protection is typically what a whole house would need, our surge protector offers a maximum of 72,000 amps spike protection.
Some protectors will have a lag before protection actually takes affect which will subject your equipment to harmful current. Our surge protector offers < 1 ns (nano-second) response time which is considered the industry standard to look for. The surge protector we sell also offers a 360º rotating flat plug to position the plug at any angle you desire in outlet. Our surge protector will use a thermal fuse to shut off your system in the event of a fire or an extreme or long- term surge or over voltage instance.
How To Install the New Front Laser Light for the INNOVA Longarm Quilting Machines

Instructions for Innova Simulator Software Installation and Updating
Make sure to have the box available during the registration process. You will need to have the code available. Go to the official Innova web site, Innovalongarm.com, and then click on Register Your Product:
Make sure to have the box available during the registration process. You will need to have the code available. Go to the official Innova web site, Innovalongarm.com, and then click on Register Your Product:

You will need to create an account if you do not already have one. You will want to have an account because there are other educational videos there for you to watch. Once you create an account, you will need to register your product by typing in the code from box. Within 24 hours of registering your product, ABM will confirm the registration and the Simulator will be available to the you. Next, you will need to go to the Innova web site, and click on Support and Resources:

and then scroll down to Software Installers and Updates:

You will be able to click on the Simulator and download it. This is the same process if you already own Simulator and want to update it.